
This guide will show you how to quickly make origami sunglasses in just a couple of minutes.
If you have colored paper you can follow along, or use a standard piece of paper to decorate after it’s done.
This is definitely a beginner fold and one of our many easy origami tutorials.
Let’s get folding!
Step 1: Fold the Right Side to Match the Top

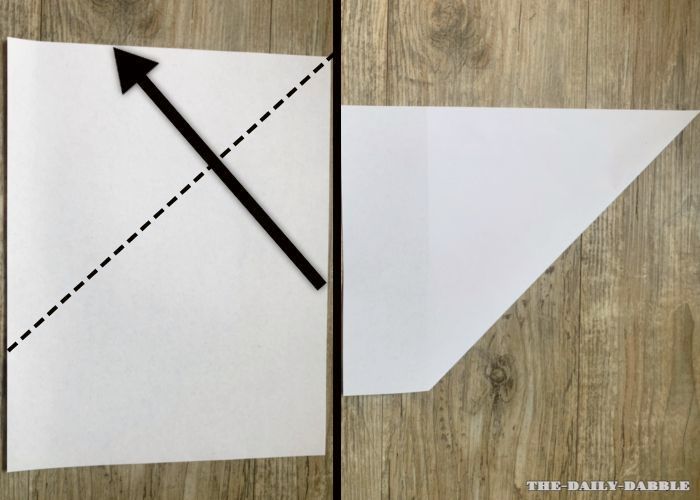
Begin with your paper right side up. Carefully fold the right side of the paper to align with the top edge.
Crease the fold well, then unfold it. This is just a preparatory step for what comes next.
Step 2: Make a Diagonal Fold Upward from Left to Right
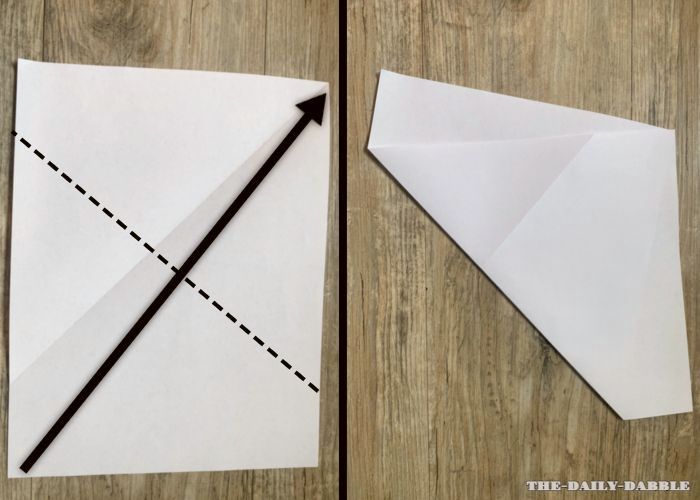
Now, take the bottom left corner and bring it up to meet the top right corner. Ensure the edges align neatly, then crease the fold firmly.
Unfold the paper again. This step sets the stage for forming the lenses of your sunglasses.
Step 3: Form the Lenses of the Glasses
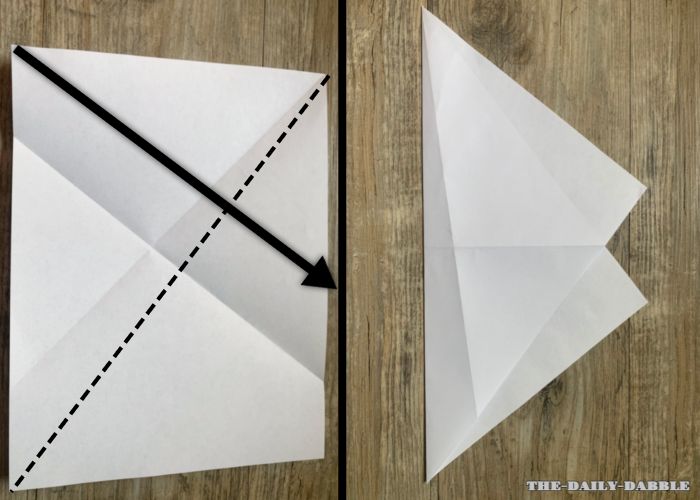
Fold the top left corner down diagonally. This fold will start shaping the lenses of the sunglasses. Aim for symmetry to make the lenses look as even as possible. Once satisfied with the placement, crease the fold well.
Step 4: Bring the Left Near the Middle of the Points
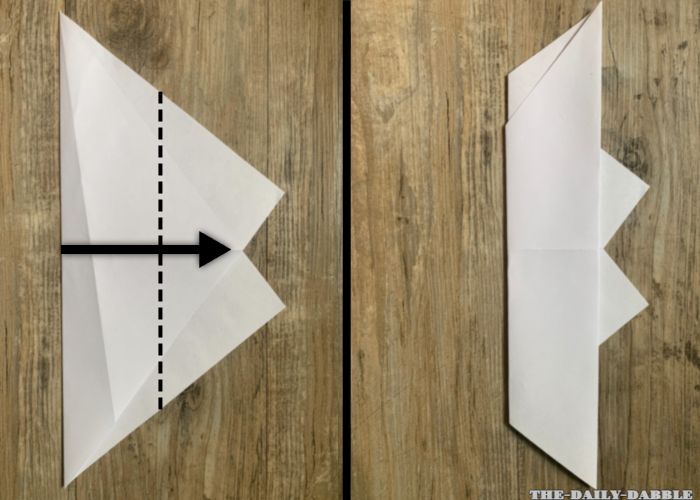
Next, fold the left side of the paper over, stopping just short of the base of the two lenses you’ve formed. Flatten this fold thoroughly to ensure it stays in place.
Step 5: Fold it in Half Twice Lengthwise
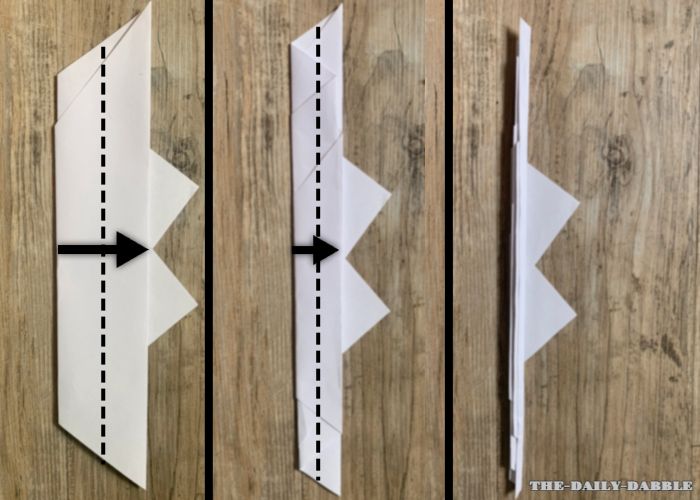
You’ll now make two consecutive folds along the length of the paper. These folds are to adjust the frame to the correct size. After each fold, press down firmly along the edges to maintain evenness and tightness.
Step 6: Finish Shaping the Sunglasses
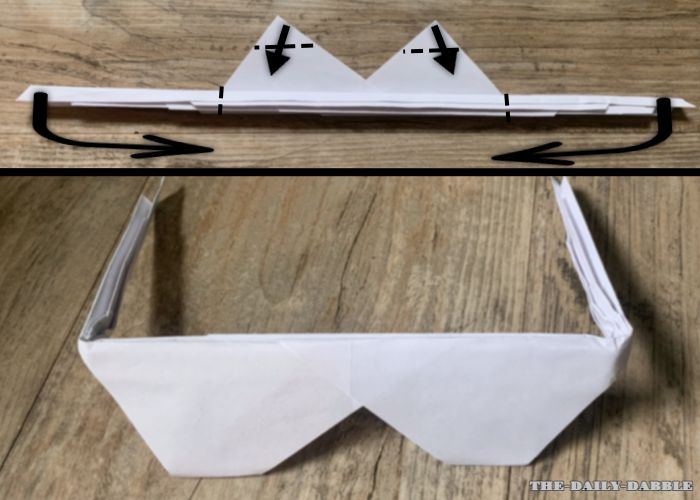
For the final touches, fold the tips of the lenses inward to shape them to your liking. This will give the sunglasses their distinctive look. Then, fold the long piece on both sides, near the edge of the lenses, to finalize the frame of your sunglasses.
Congratulations, you’ve just completed a pair of cool origami sunglasses!
This project is not only easy but also a great way to explore the basics of origami.
Feel free to experiment with different paper sizes and colors to create your unique collection of paper sunglasses.
Troubleshooting Common Issues in Folding Origami Sunglasses
While folding origami sunglasses is a beginner-friendly activity, it’s common to encounter a few challenges along the way. This section provides solutions to some typical issues you might face, ensuring your origami sunglasses turn out just right.
Issue 1: Misaligned Folds
- Problem: If your folds are not precisely aligned, the sunglasses may look asymmetrical.
- Solution: Always take extra care to align the edges and corners exactly before making a crease. Use a bone folder or a similar tool for sharper, more accurate folds.
Issue 2: Paper Tearing
- Problem: Origami paper might tear if it’s folded and unfolded multiple times at the same spot, especially if the paper is thin.
- Solution: Use thicker paper if you’re a beginner, as it’s more forgiving. If you’re using thin paper, try to be gentle and avoid repeatedly folding the same area.
Issue 3: Difficulty in Creating Symmetrical Lenses
- Problem: Getting both lenses of the sunglasses to look identical can be challenging.
- Solution: After the initial diagonal fold (Step 3 in the guide), check the symmetry of both lenses. Adjust as necessary before making a firm crease. You can also use a ruler or a template for more precise folding.
Issue 4: Creases Aren’t Holding Shape
- Problem: Sometimes, the paper doesn’t stay folded, and the creases may unfold slightly.
- Solution: Reinforce each crease by running your finger or a tool along the fold several times. For papers that don’t hold creases well, a light application of glue or double-sided tape at strategic points can help.
Issue 5: Sunglasses Not Retaining Form
- Problem: After completing the folding process, the sunglasses may not hold their shape well.
- Solution: Use a bit of clear tape or glue to secure the key joints, especially where the frames and lenses meet. Be careful not to use too much, as it can make the paper stiff and unwieldy.
Issue 6: Difficulty in Folding Thick Paper
- Problem: If you’re using thicker paper for durability, it can be hard to fold.
- Solution: Score the paper lightly along the line where you need to fold. This can be done using a blunt knife or an empty ballpoint pen. Be careful not to cut through the paper.
By addressing these common folding issues, you can enhance your origami experience and ensure that your paper sunglasses are as neat and symmetrical as possible. Remember, patience and practice are key in origami – each fold brings you closer to perfecting your craft!
Decorating and Customizing Your Origami Sunglasses
Once you have mastered the basic folding technique for origami sunglasses, the next exciting step is to personalize and decorate them. This section provides ideas and tips for customizing your paper sunglasses, transforming them into unique creations.
1. Coloring and Pattern Design
- Idea: If you started with plain paper, use markers, colored pencils, or paints to add colors and patterns.
- Tip: Decorate the paper before folding for a more uniform design. Ensure the coloring medium is dry to avoid smudging during folding.
2. Adding Shine and Texture
- Idea: Use glitter, metallic markers, or gel pens to add shiny elements to your sunglasses.
- Tip: Apply these embellishments on the edges of the frames or along the creases for a subtle yet impactful look. Be mindful of the amount of glue or adhesive used, as it can weigh down the paper.
3. Creating Themed Sunglasses
- Idea: Design your sunglasses based on different themes like holidays, seasons, or favorite characters.
- Tip: Use themed stickers or draw specific motifs related to your chosen theme. Consider the overall look to keep the design cohesive.
4. Reinforcement for Durability
- Idea: To make your sunglasses more durable, reinforce them with clear tape or a thin layer of clear glue.
- Tip: Apply the reinforcement on the inside of the sunglasses to keep the exterior design clean and uninterrupted. Focus on the creases and joints for added stability.
5. Layering Paper for a 3D Effect
- Idea: Use multiple layers of paper in different colors or patterns to create a 3D effect.
- Tip: Cut out additional paper shapes that mimic the shape of the sunglasses’ lenses or frames and layer them on top. Secure them with glue or double-sided tape.
6. Making Wearable Origami Sunglasses
- Idea: Although paper sunglasses are not practical for actual wear, you can create a wearable version by attaching a thin elastic band.
- Tip: Punch tiny holes at the sides of the frames and tie the elastic band securely. Ensure the band is snug but comfortable if worn.
7. Adding a Glossy Finish
- Idea: Give your sunglasses a glossy finish by using clear nail polish or a spray-on sealer.
- Tip: Apply a light coat to avoid soaking the paper. This not only adds a sheen but also provides a bit of water resistance.
With these customization tips, your origami sunglasses can be more than just a paper craft – they become a medium for artistic expression. Experiment with different designs and techniques to see what works best for you. Enjoy the process of making each pair of origami sunglasses uniquely yours!